

How do I connect water, sewer, and electricity safely for the first time?
Hooking up your RV for the first time can seem intimidating, but once you understand how each utility connects, it becomes second nature. Whether you’re setting up a motorhome, fifth wheel, or travel trailer, this step-by-step guide will walk you through exactly how to connect water, sewer, and trash services safely and efficiently at your campsite.
When you first pull into your RV site, start by making sure your camper is level and stable before you touch any utilities. Use leveling blocks, built-in auto-leveling systems, or jacks to get your rig even, and always chock your wheels so it can’t roll. A level RV not only feels more comfortable inside but also helps your plumbing drain properly and keeps your refrigerator operating efficiently. Once you’re stable, you’re ready to hook everything up.
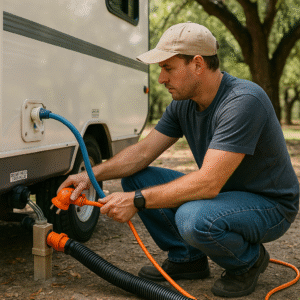
Connecting to fresh water is your next step. Most RV parks, including Meadowlark Shores RV Resort, provide a spigot or city water hookup at each site. You’ll need a white drinking water hose, a water pressure regulator, and ideally a water filter. Attach the pressure regulator directly to the park’s spigot first — this protects your RV’s internal plumbing from high water pressure that could cause leaks or damage. Next, connect the water filter to the regulator, and then attach your white hose. The other end of that hose connects to your RV’s “City Water Inlet,” usually located near the driver’s side. Hand-tighten each connection, but avoid overtightening, as that can damage the threads. Once everything is in place, slowly open the water valve and check for leaks. If water flows smoothly, you’re good to go. For longer stays, you may want to add a small section of foam insulation or a hose cover to protect your line from sunlight or temperature changes.
The sewer hookup can sound unpleasant, but it’s an important and straightforward part of RV life. You’ll need a standard RV sewer hose, sometimes called a “stinky slinky,” along with an elbow adapter and a rubber gasket to ensure a tight fit. Always begin this process with both your gray and black tank valves closed. Attach one end of the sewer hose to your RV’s outlet and lock it in place. Then, insert the other end into the park’s sewer inlet — most campgrounds require a tight-fitting adapter or elbow to prevent leaks or odors. If possible, use a sewer hose support ramp to create a gentle downward slope from your RV to the sewer connection; this allows gravity to do the work and keeps waste moving smoothly. When it’s time to dump your tanks, always start with the black tank first (the one connected to your toilet). Once it’s drained, close the valve and then open the gray tank valve. The gray water helps flush out your sewer hose, leaving it cleaner. After dumping, rinse the hose with fresh water, cap both ends, and store it separately from your clean water equipment. Disposable gloves and hand sanitizer are must-haves for this task, especially if you’re new to RVing.
Once water and sewer are connected, check for electrical service. Most parks provide either 30-amp or 50-amp outlets. Always verify which one your rig requires before plugging in. Before connecting, make sure your RV’s main power breaker is off. Inspect the power pedestal for any signs of damage, such as burn marks or loose connections. If everything looks safe, plug in your surge protector first, then connect your RV’s power cord to it, and finally plug into the pedestal. Flip the breaker on the pedestal, then turn on your RV’s main power switch. Using a surge protector is always recommended; it helps prevent electrical damage from power surges or incorrect wiring.
Trash management may seem like an afterthought, but it’s an important part of keeping your campsite clean and the park pleasant for everyone. Most RV resorts have dumpsters or designated trash areas — at Meadowlark Shores, for example, you’ll find them conveniently located throughout the park. Always bag your trash securely, never leave loose items outside, and keep lids closed to avoid attracting wildlife. Do not dispose of hazardous materials like oils, batteries, or chemicals in regular trash containers. Many resorts also provide recycling bins for cans, bottles, and cardboard, so check with the office about recycling options when you check in.
After all connections are made, take a few minutes for a final inspection. Check under your RV and around each hookup point for leaks, drips, or loose fittings. Confirm that your sewer hose is properly secured and draining at a slight angle. Test your water pressure, check that your power is running smoothly, and make sure your trash area is easy to reach. These few minutes of double-checking can save you a lot of trouble later.
For beginners, it’s helpful to keep a small “hookup kit” stored in an outside compartment. This kit should include your water pressure regulator, white drinking water hose, inline filter, sewer hose and fittings, hose support stand, gloves, sanitizer, surge protector, and a small wrench or pliers. Keeping these items organized makes setting up and breaking down your campsite much quicker.
Connecting water, sewer, and trash for the first time doesn’t have to be complicated. Once you’ve done it a few times, it becomes routine. With the right tools and a calm, step-by-step approach, you’ll be fully connected in less than 15 minutes. Before long, you’ll feel like a pro setting up your site — whether you’re parked riverside under the oaks at Meadowlark Shores RV Resort or enjoying rocket launches on Florida’s Space Coast at Cape Kennedy RV Resort. Once everything is hooked up, you can relax, enjoy your surroundings, and start making the most of your camping experience.
📍 4513 St Rd 46, Mims, FL
For any questions or concerns please reach out to us
📞 (321) 269-7361